1. How to embed Cincopa Gallery on a Tumblr blog or post?
You can easily embed / post your Cincopa Gallery in tumblr blog.
Please follow the steps below:
1. Create your Cincopa gallery.
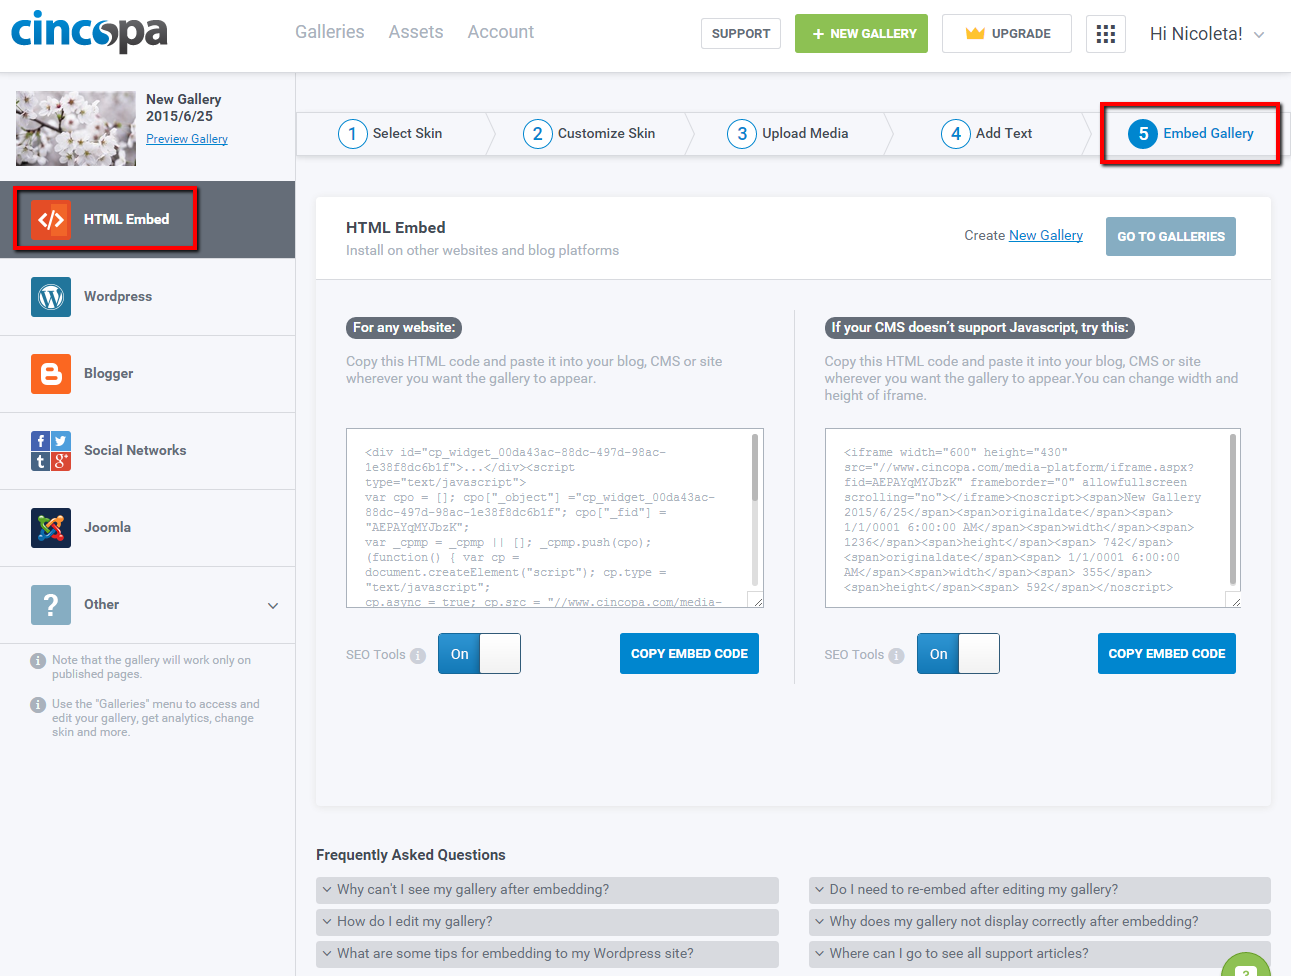
2. On step 4 “Embed Your Gallery” page, choose “No JS Support”, set the iframe size to your desired size and copy the code for your gallery.
3. Go to your Tumblr dashboard.
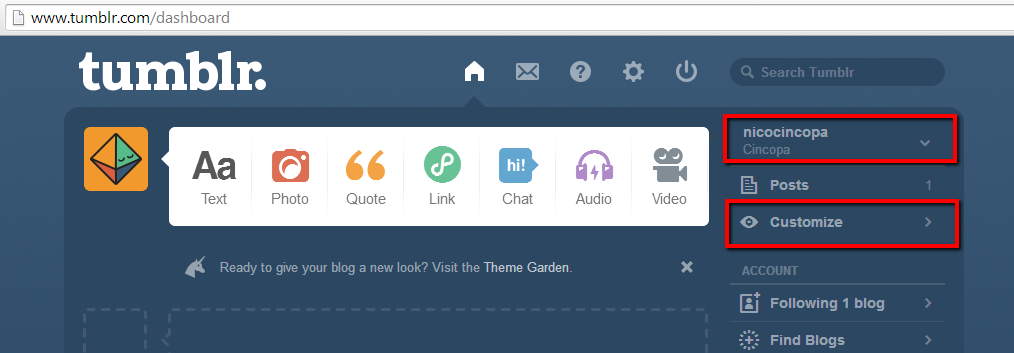
4. Click your Tumblr blog’s name at the top of the Tumblr dashboard. Click “Customize” on the right side of the screen.
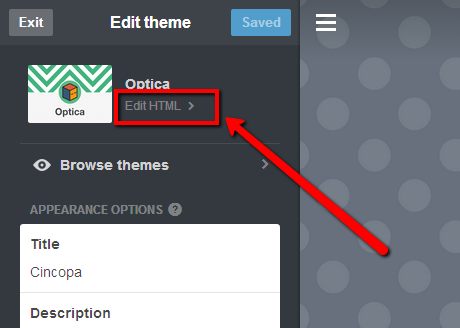
5. Click “Edit HTML” under your website theme. The screen will change to display your blog’s current HTML code.
6. Click anywhere in the code, based on where you want to add code, and press “Enter” to create a new line. Insert the gallery HTML code.
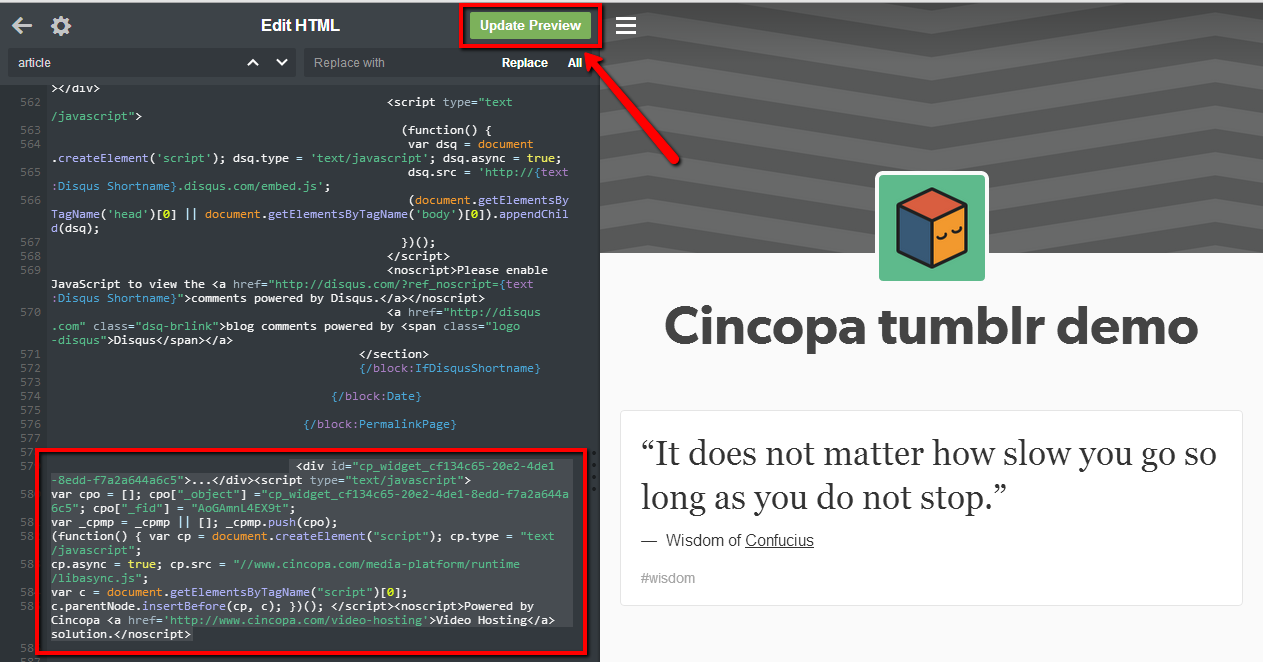
7. Click “Update Preview” to preview the changes in your blog’s Customize page.
Click “Save” and “←” at the top of the screen to save your HTML changes to your TUMBL blog and go back to your Tumblr dashboard.

You can also embed your gallery in a post by clicking on “Dashboard” icon, click on “Text” and select the blog you will like to post the gallery to. Insert a suitable title, and paste the gallery embed code you copied earlier.

That’s it you are done embedding your gallery on your Tumblr blog.
*Please note that Tumblr no longer supports Javascript in posts, this may affect how responsive galleries are displayed.
2. How to embed Cincopa Gallery in Squarespace website?
You can easily embed your Cincopa Gallery in Squarespace website.
Please follow the steps below:
1. Create your Cincopa gallery.
2. On step 4 “Embed Gallery” page choose Other – “Squarespace” and copy the code for your gallery.
3. Go to your Squarespace admin panel. Open a page or post editor. Click an Insert Point and select Code from the Block Menu.

4. Click inside the Embed Code element to paste the Cincopa gallery code.

6. Code is added to your site. Publish your Squarespace website page.

3. How to embed Cincopa Gallery in your Shopify website?
You can easily embed your Cincopa Gallery on Shopify website.
Please follow the steps below:
1. Create your Cincopa gallery.
2. On step 4 “Embed Your Gallery” page choose “HTML” and copy the code of your gallery.
3. Go to your Shopify admin panel.
Click on the page or blog post you would like to embed Cincopa gallery.
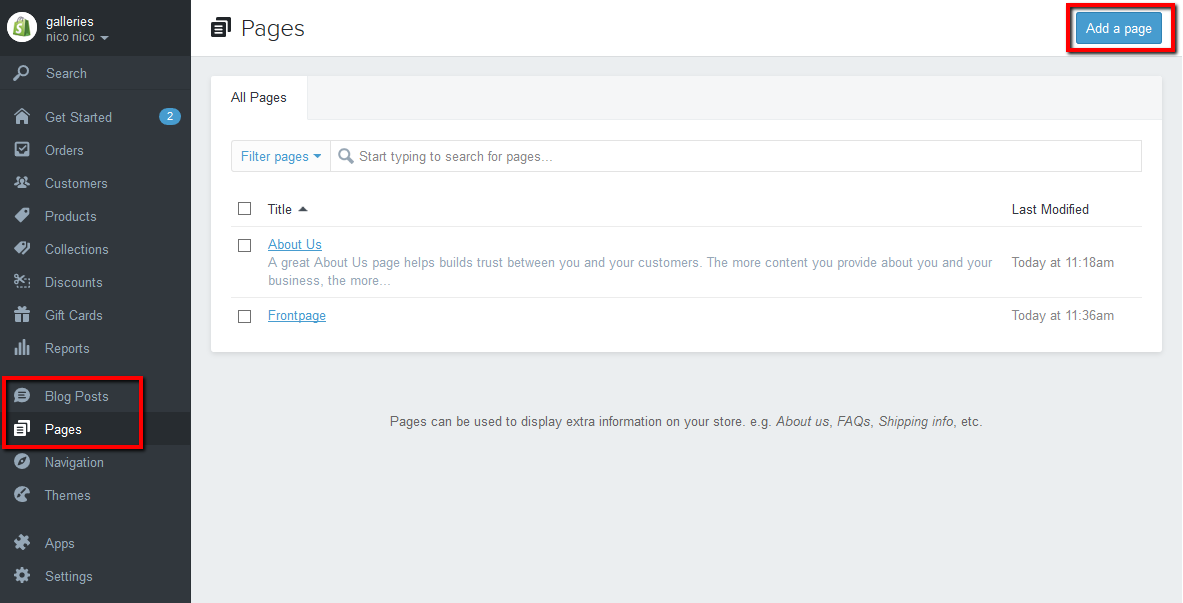
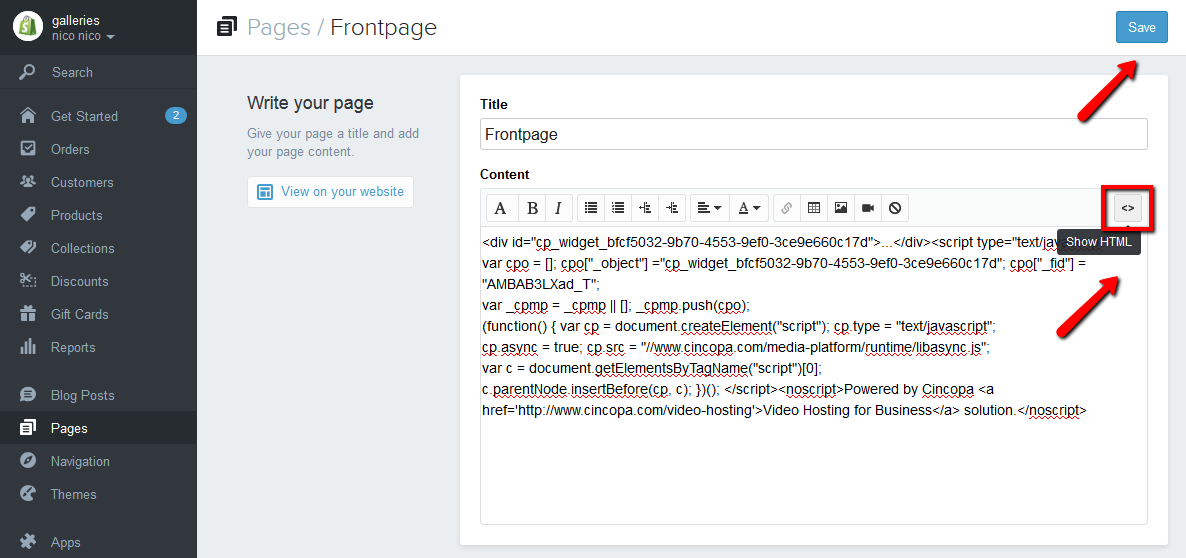
4. Click to ‘Show HTML‘ and then paste Cincopa gallery code you previously copied. Click ‘Save‘ to save changes and then ‘View on your website‘.
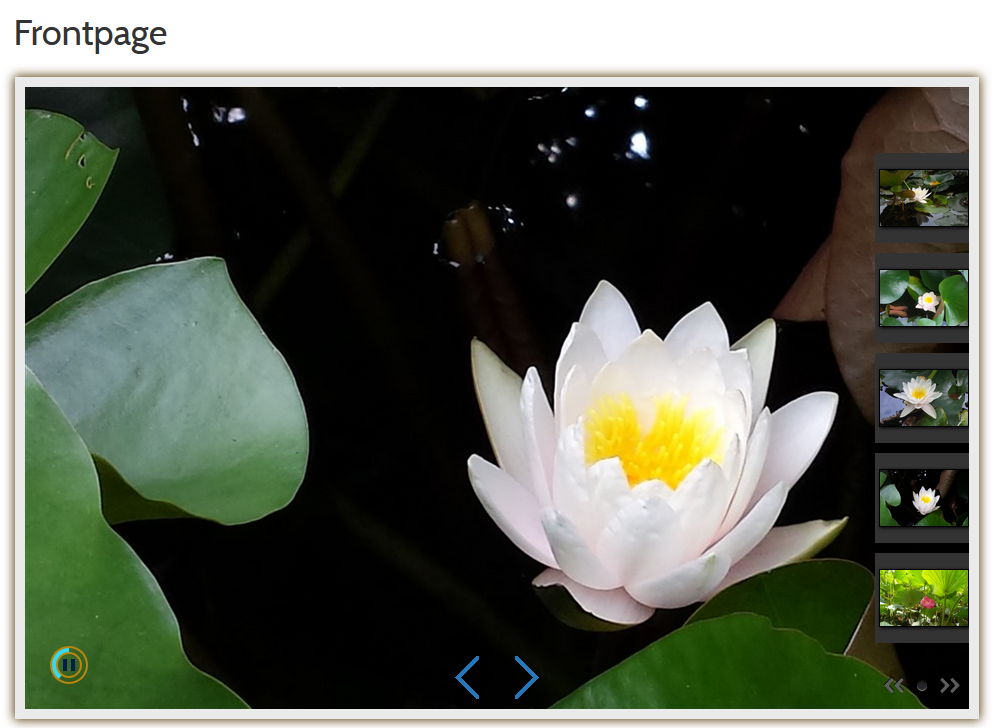
5. Gallery is added to your Shopify website.
4. How to embed Cincopa Gallery in Jimdo website?
You can easily embed your Cincopa Gallery on Jimdo website.
Please follow the steps below:
1. Create your Cincopa gallery.
2. On step 4 “Embed Your Gallery” page choose “HTML” and copy the code of your gallery.

3. Go to your Jimdo admin panel.
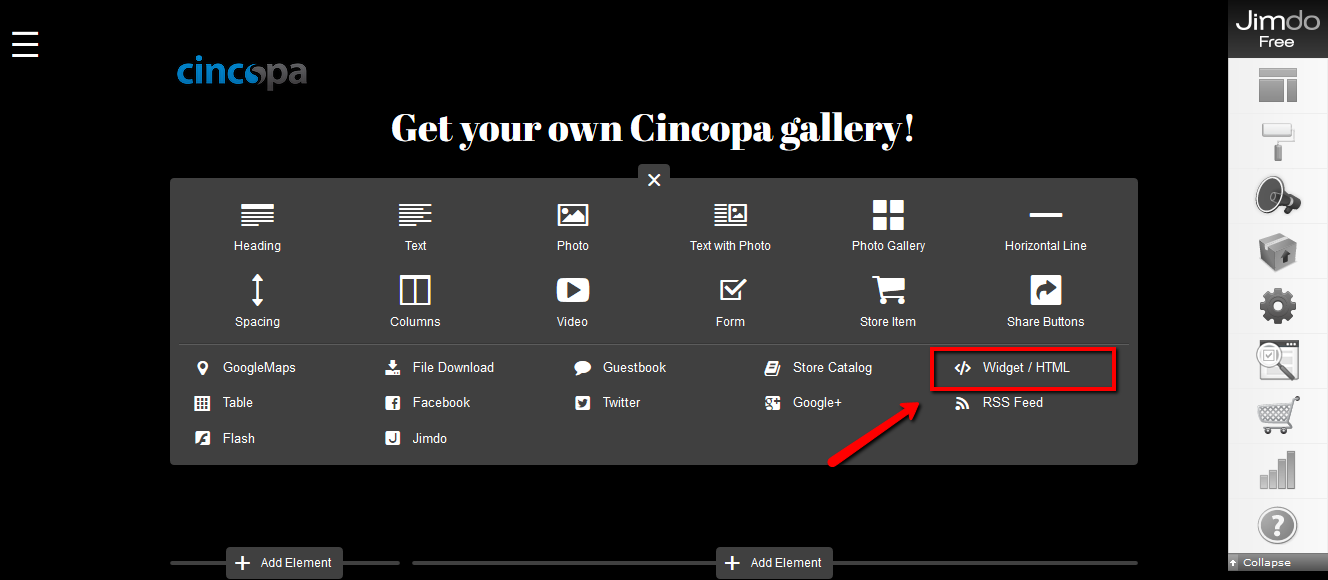
Click on “Add Element”.

4. Click on “… Additional Elements”.
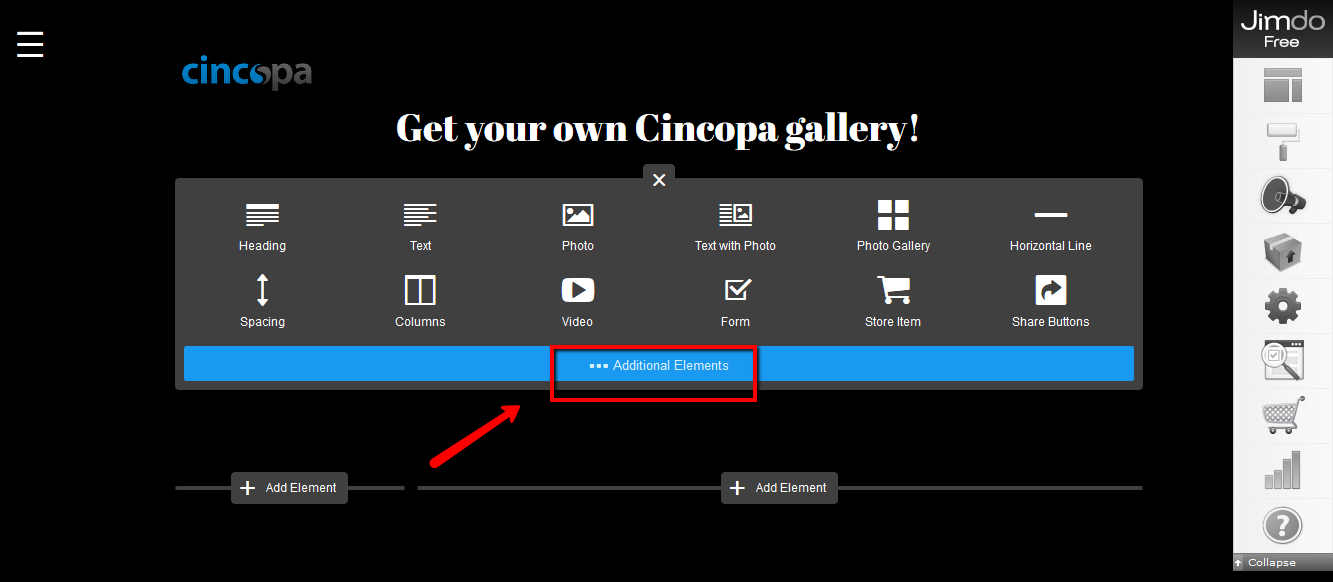
5. Click on “</> Widget / HTML”.
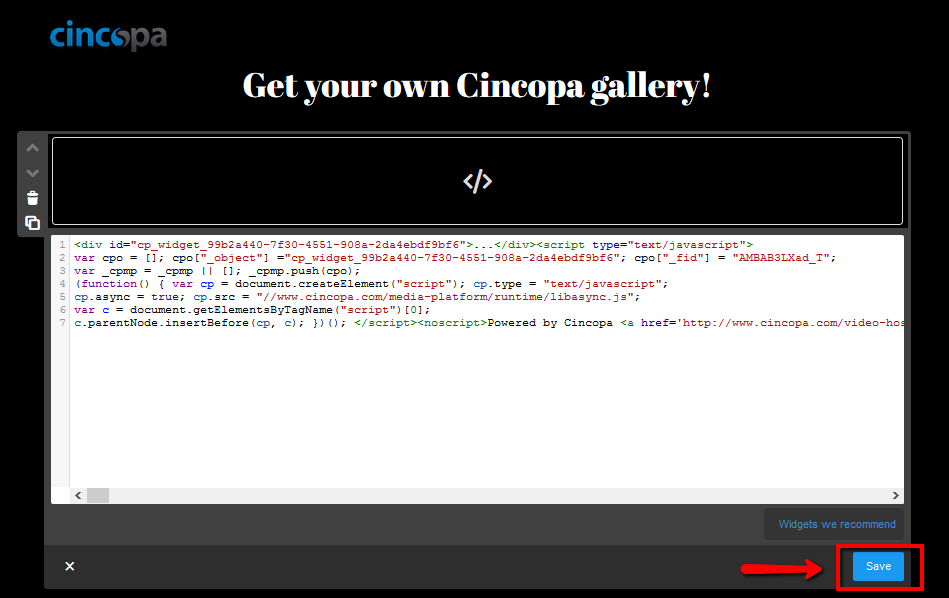
6. Click inside the Embed Code element to paste the Cincopa gallery code and then Save changes.
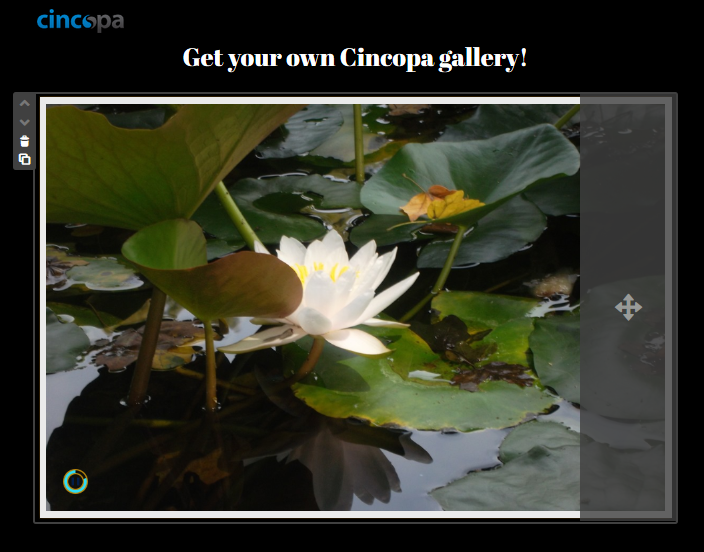
7. Code is added to your Jimdo site.
5. How to embed Cincopa gallery to Dreamweaver website?
You can easily embed your Cincopa Gallery in Dreamweaver website.
Please follow the steps below:
1. Create your Cincopa gallery
2. On step 4 “Embed Gallery” page choose “html” and copy the code of your gallery.

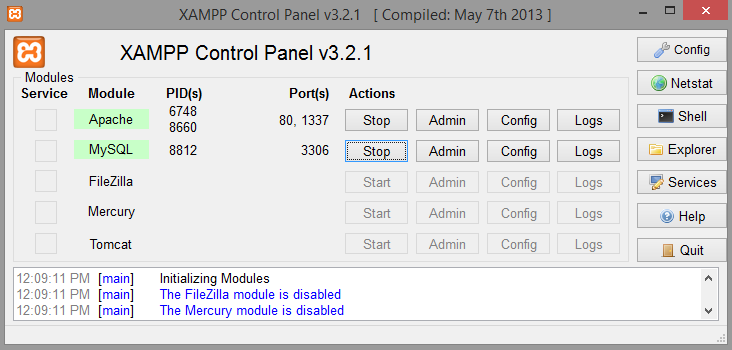
A. Make sure you have your own web server installed on your system. (eg. in this case we used XAMPP)
NOTE: Skype won’t work together with xampp because they use the same port. You can close skype when using xampp and change the port later for skype.
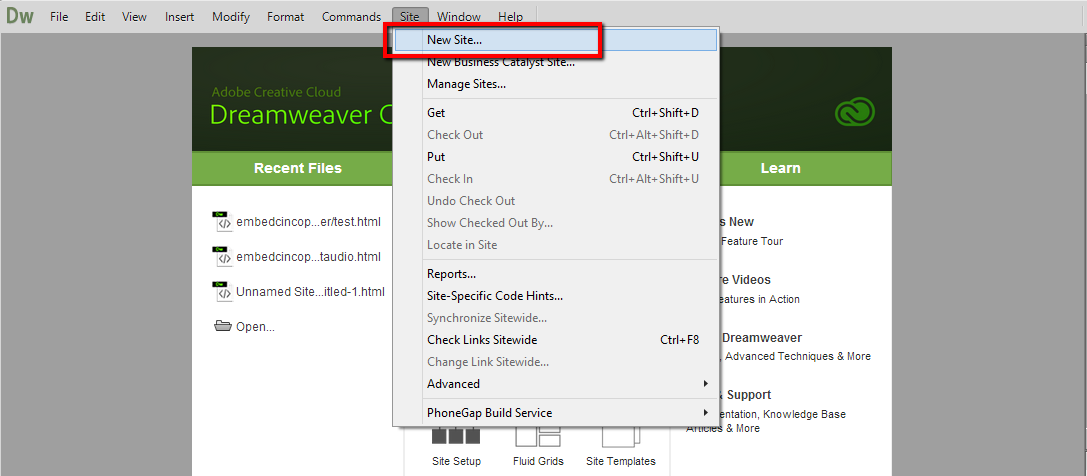
3. Open Dreamweaver and choose to create a new site.
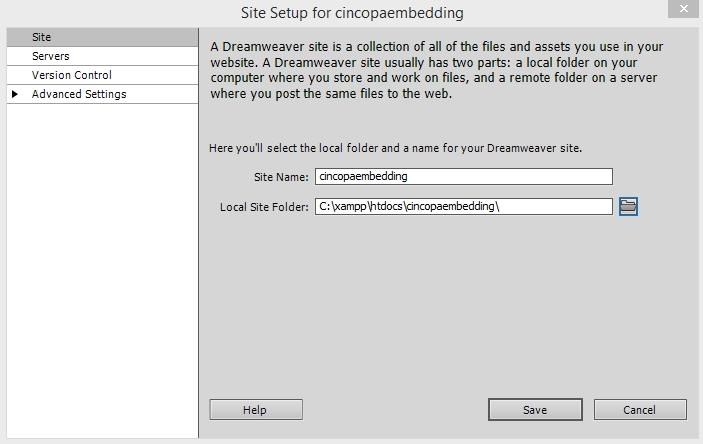
4. Type your site name and click on browse button to locate you htdocs folder (which is normally inside you xampp folder on you root directory).
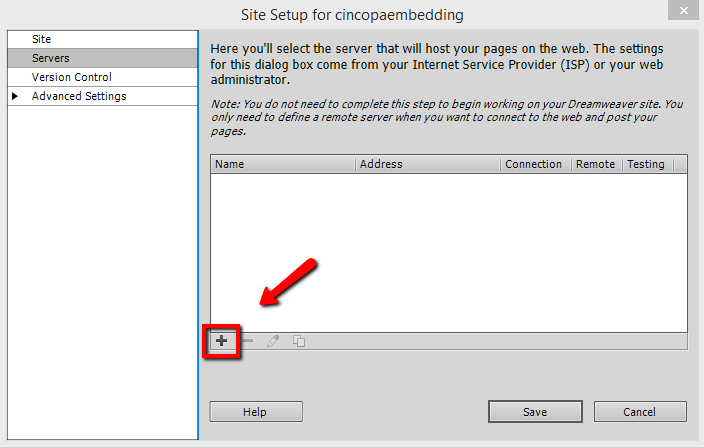
5. Select Server from left hand side and click on add (+) sign.
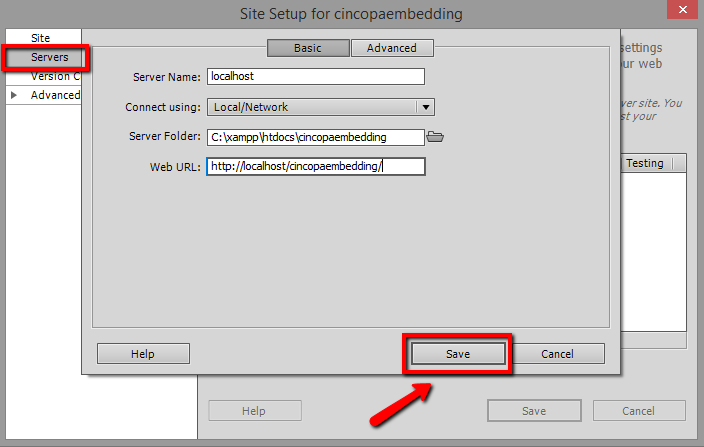
6. Fill in with data:
Server Name: localhost
Connect Using: Local/Network
Server Folder: (where is your site located this should be inside you htdocs folder)
Web URL: http://localhost/yourSideName (yourSiteName is name of your folder)
Click Save.
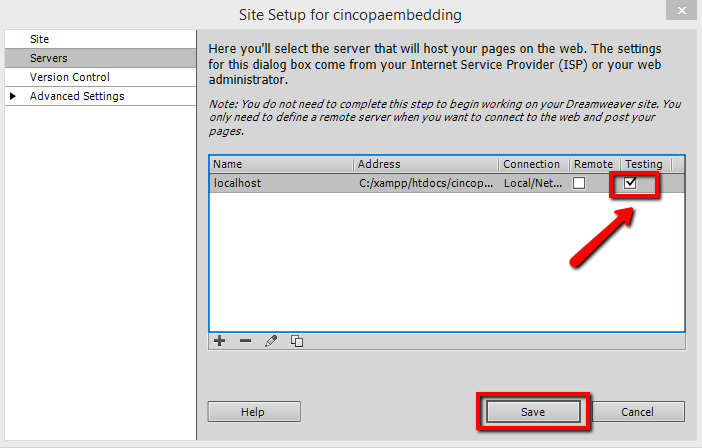
7. Check “Testing” checkbox and click Save.
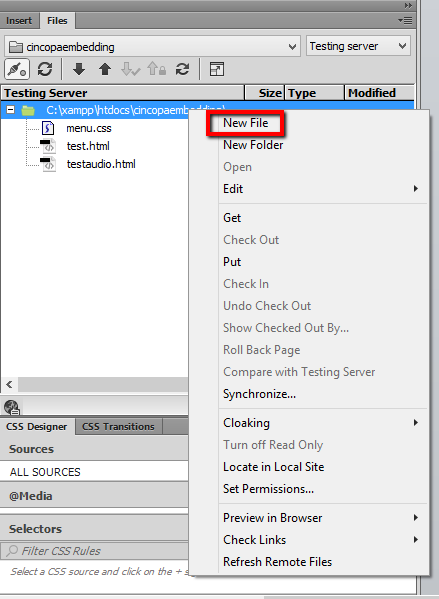
8. Open File Panel window > Files. Create new file and Save it inside your folder.
B. Or if you already set up your site go to your Dreamweaver admin panel.
1. Select to open a recent file or create a new html page.

2. Paste Cincopa gallery html code.
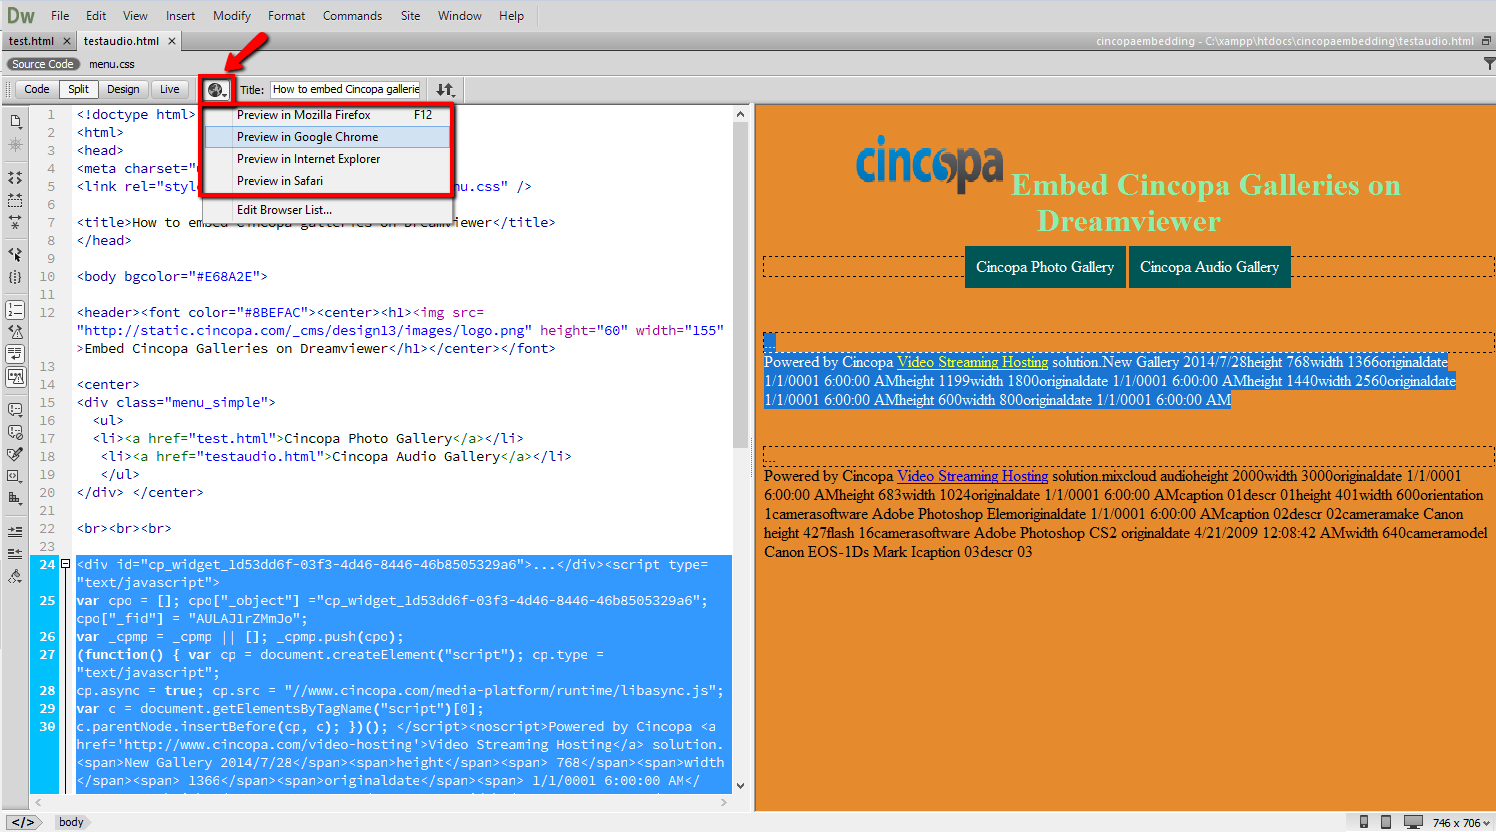
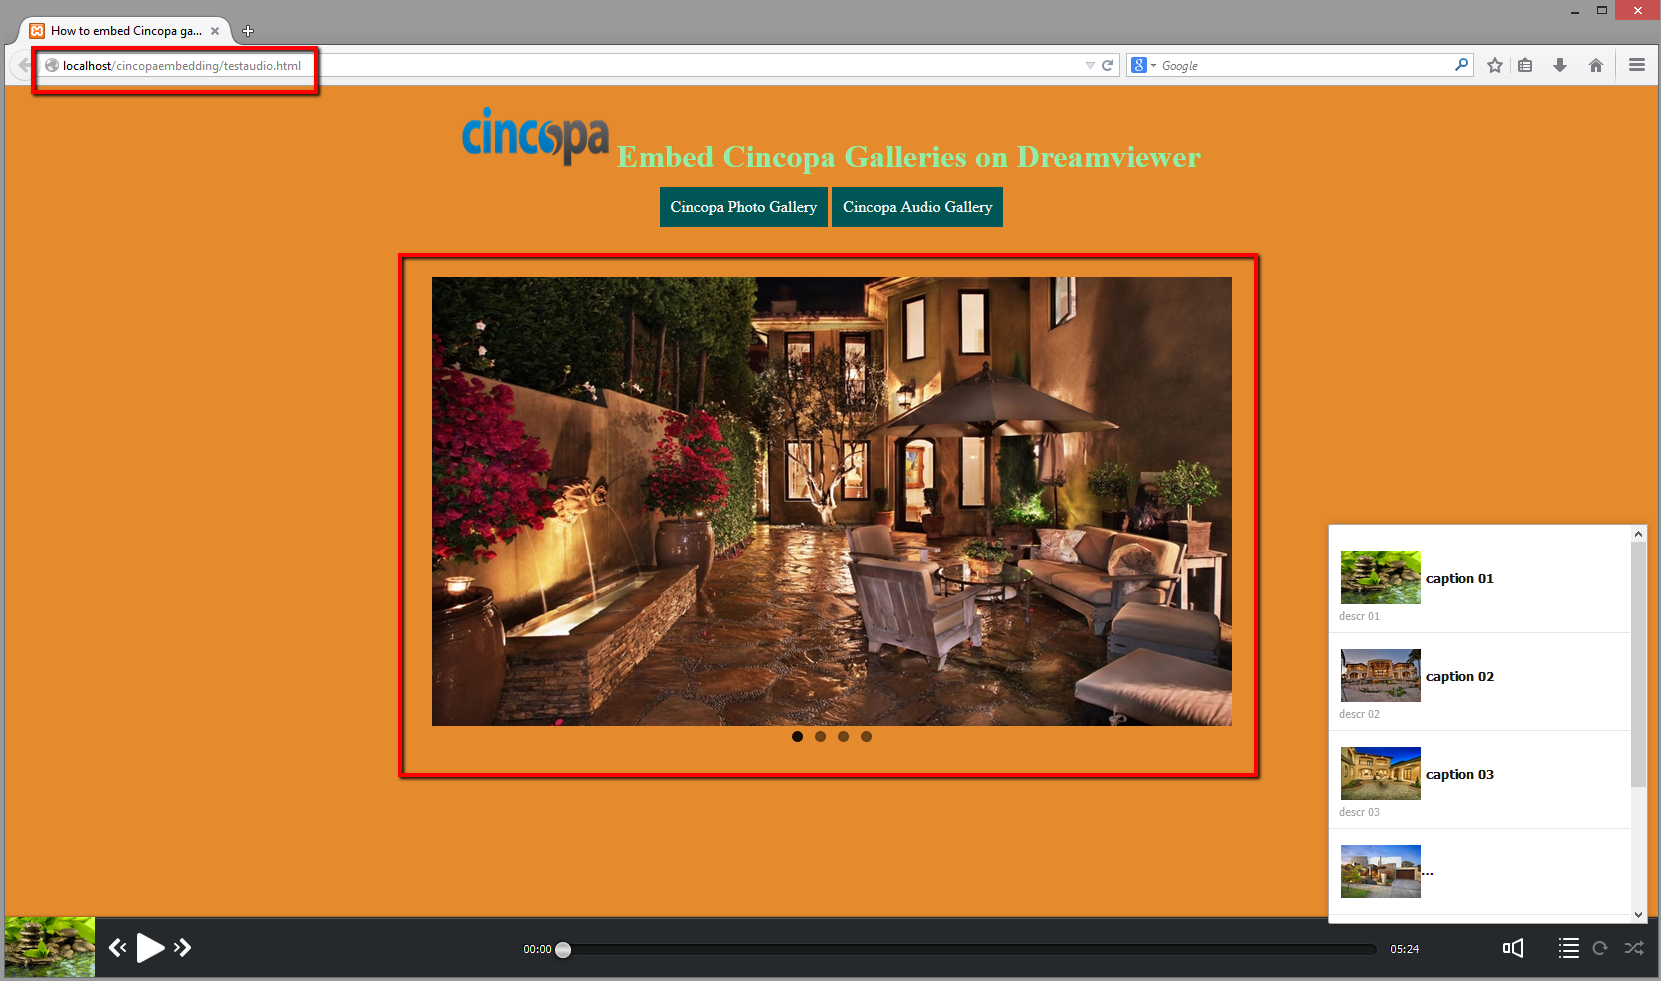
3. Code is added to your webpage. You can preview it now.
6. How to embed Cincopa Gallery on a moonfruit website?
You can easily embed your Cincopa Gallery in ![]() website.
website.
Please follow the steps below:
1. Create your Cincopa gallery
2. On step 4 “Embed Gallery” page choose “HTML” and copy the code suited for your website.

3. Go to your ![]() edit panel.
edit panel.
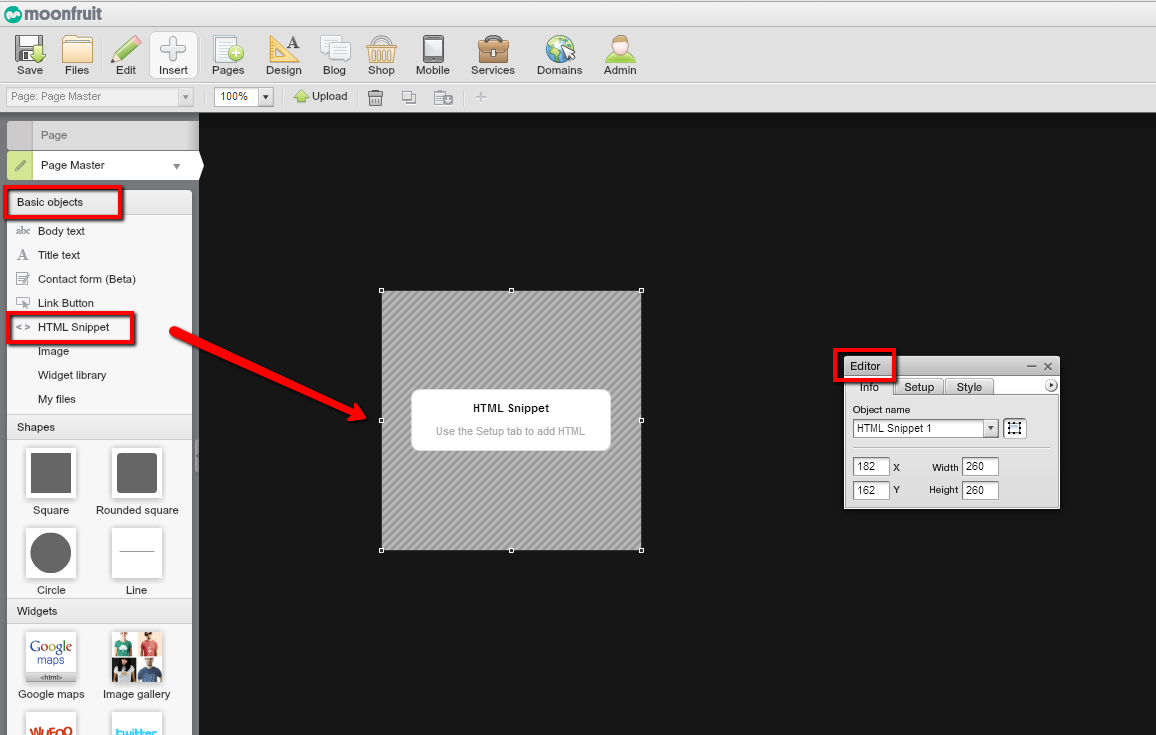
4. Click on Insert.

5. From Basic objects, click < >HTML Snippet.
6. HTML Snippet element will be displayed along with its Editor.
NOTE: On Editor, Info tab you can change width and height of HTML Snippet element or just drag to resize it as needed.
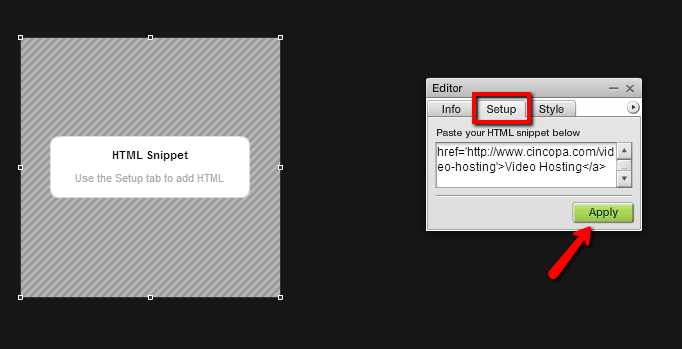
7. From Editor click Setup where you can type or paste your HTML code.
 .
.
8. Click Apply.
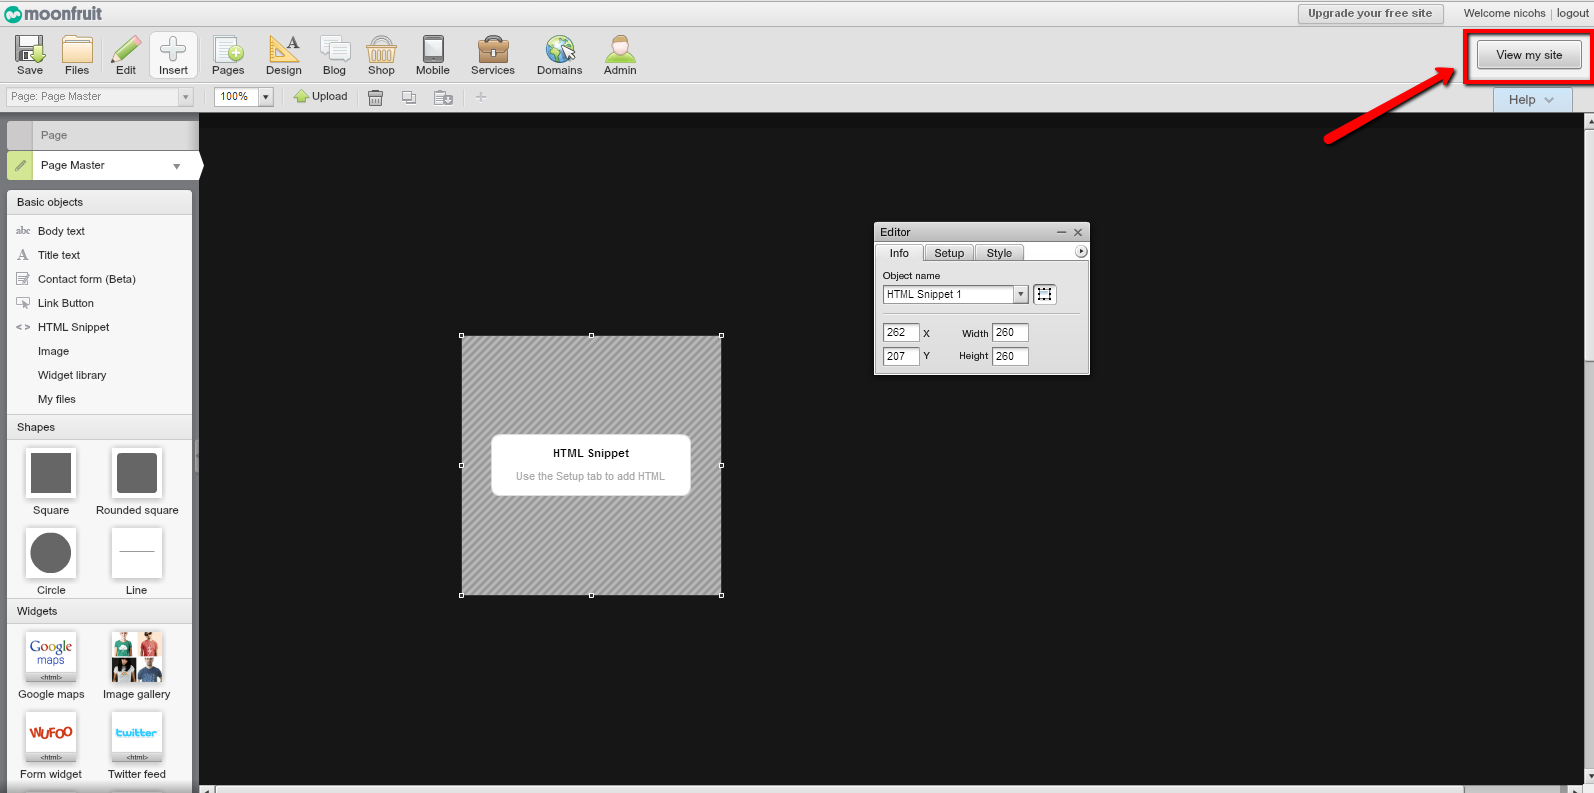
9. Click View my site to preview changes.
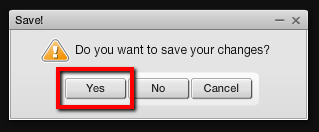
10. A warning popup message will appear > select Yes.
11. HTML code is added to your site.
NOTE: Moonfruit sites are always ‘live’ online, you don’t have to publish them. Your pages are always available to people visiting your site and changes that you make happen instantaneously.
7. How to embed a Cincopa Gallery on your Yola website?
You can easily embed your Cincopa Gallery into yola website.
There are two methods that you can use:
1. Either you can choose an already created gallery to embed into your website by going to My Galleries page.
Click on the arrow near “Edit Gallery” under the gallery you would like to embed and then click“Embed it”.

2. Or Create your new Cincopa gallery.
NOTE: Both methods bring you to the same page > step 4.
3. On step 4 “Embed Gallery” page choose “HTML” and copy the code suited for your website.

4. Go to your yola edit panel.
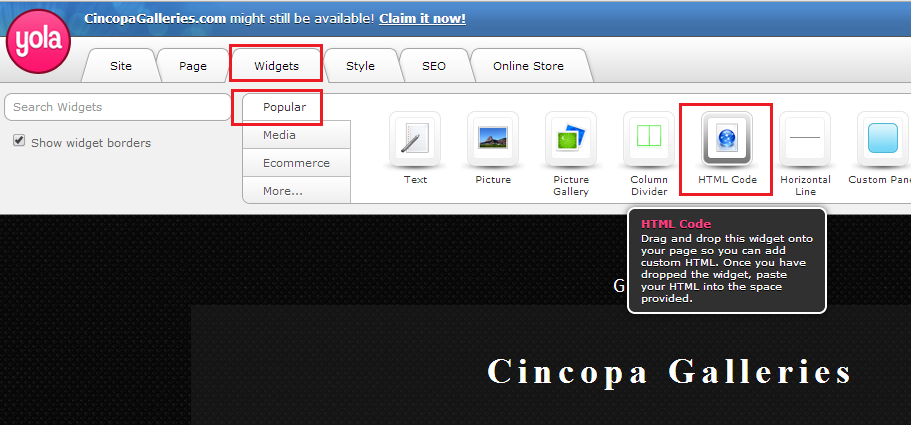
5. Click on “Widgets” > “Popular”
6. Drag and drop the “HTML Code” Widget onto your page.
7. The HTML editor will open up allowing you to write or paste your code.
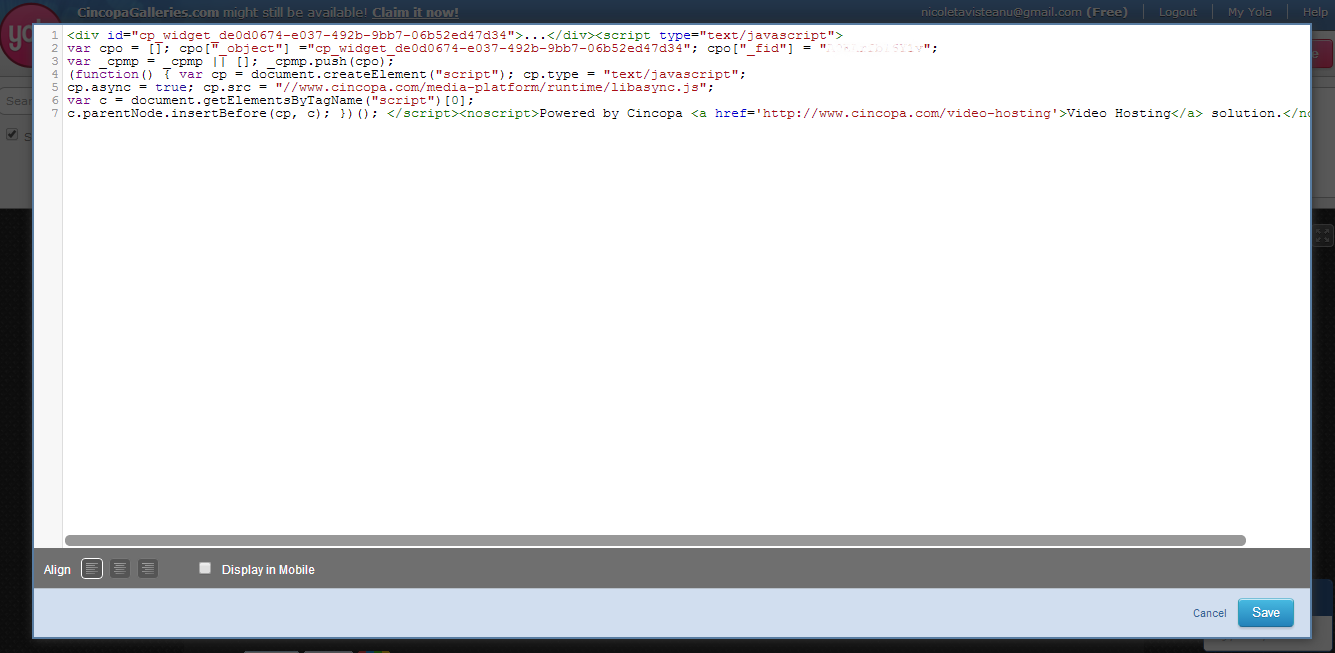
8. When you are done, click “Save”.
9. HTML code is added to your site.
8. How to embed Cincopa Gallery on a Wix website?
You can easily embed your Cincopa Gallery in Wix website.
Please follow the steps below:
1. Create your Cincopa gallery
2. On step 4 “Embed Your Gallery” page choose Others – “Wix” and copy the code of your gallery
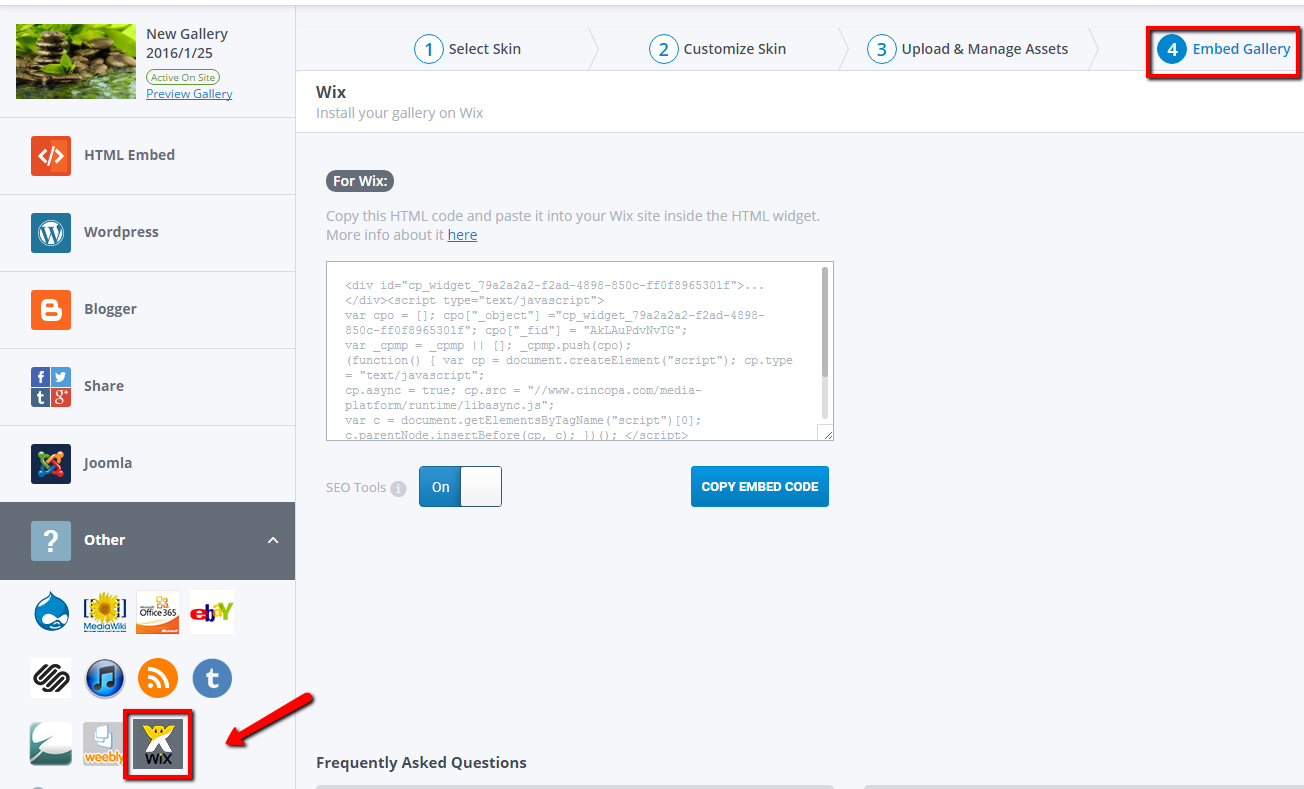
3. Go to your Wix edit panel
4. From the left side of the Editor, click the market icon to open Wix App Market.
5. From Wix App Market, click HTML iFrame/Embed.
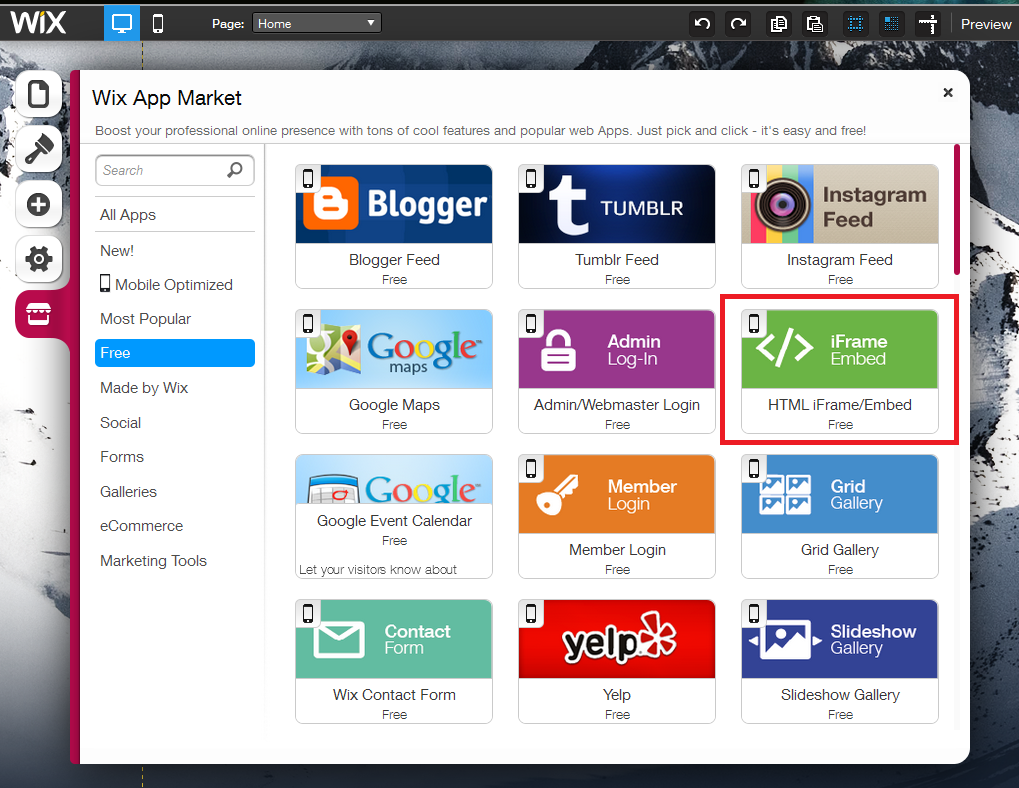
6. From HTML iFrame/Embed, click Add to site
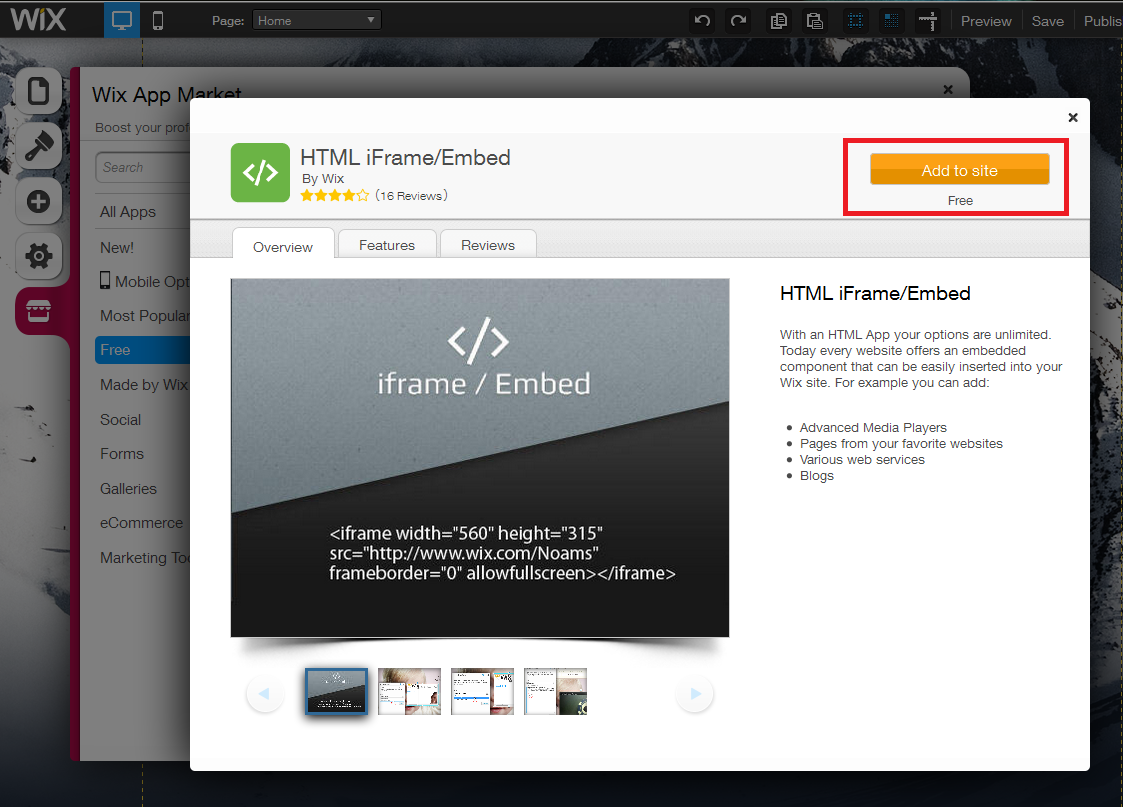
7. Click the app to select it and then click Settings.
8. From HTML Settings, under Mode, click the drop-down menu and select HTML code.
9. Under HTML/embed code, type or paste your HTML code.
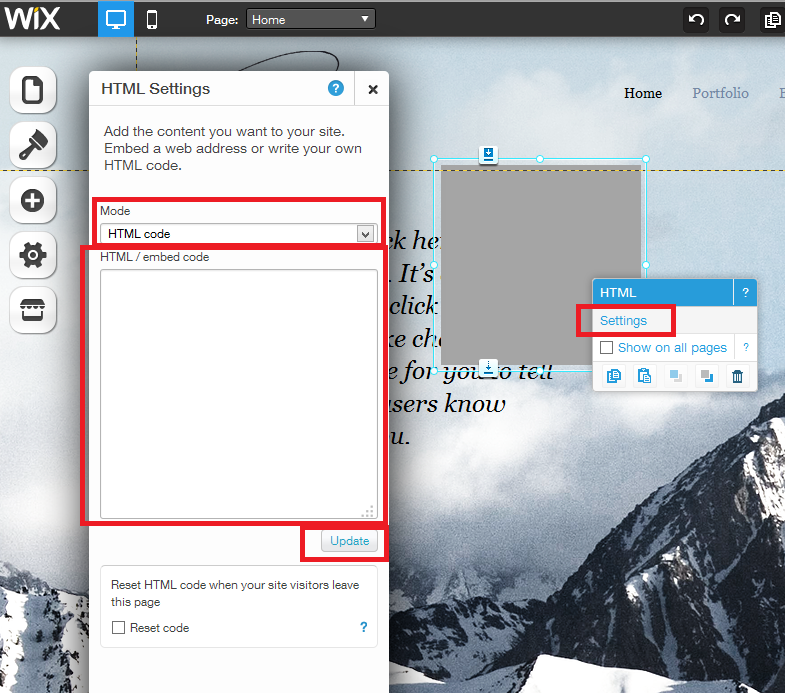
10. Click Update.
NOTE: The Reset code checkmark is used to reset the HTML code and stop it from running when a visitor leaves the current page.
11. Click outside of the HTML App to close HTML Settings.
12. HTML code is added to your site.
13. Save and Publish your Wix website page.
9. How to embed Cincopa Gallery in Webs.com website?
You can easily embed your Cincopa Gallery in Webs website.
Please follow the steps below:
1. Create your Cincopa gallery
2. In the “Embed Gallery” page choose “HTML”

3. Go to your Webs dashboard and select “Other” from the lower options menu, drag it to the page.
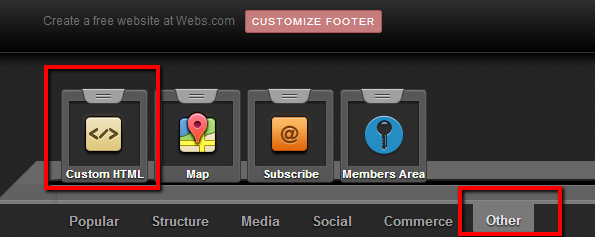
4. Double click on the HTML window to open a text editor

6. Paste the Cincopa code to the HTML.
7. Save changes and publish your Webs site.
10. How to add Cincopa gallery to Tripod CMS website?
Cincopa gallery can be used with http://www.tripod.lycos.com/ website creating software.
To add the gallery to your Tripod website please go to Tripod control panel.
Choose “Base Content” category from the “Add-ons” menu

Choose and drag the “Custom HTML” add-on to the desired location on your webpage.

Once the add-on is added, you will need to paste the Cincopa gallery code into it.
To do so please click the settings icon on the add-on

Name your gallery and enter the Cincopa HTML code to the “Custom HTML” field and click “Save”. Click here to seehow to get the code

Please note that free Tripod users can use only the frame code without JAVASCRIPT which is located right beside to the regular code. Paying Tripod users should be able to use any Cincopa HTML code.

11. How to add Cincopa gallery on Google Sites?
You can embed your Cincopa gallery on Google Sites website and enjoy Cincopa beautiful gallery design templates.
Please login to your Cincopa account, open new browser tab and login to your Google Sites account.
NOTE: We recommend using Google Chrome browser in this process.
Follow the below steps:
1. Click “Edit” page in your Google Sites webpage admin panel
2. Click “Insert” and go to “More gadgets…”

3. Choose “Add gadget by URL”
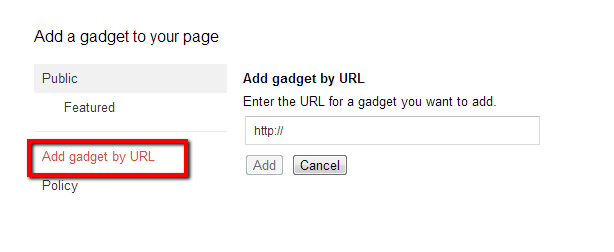
4. Enter the below URL:
https://www.cincopa.com/media-platform/cincopa_gadget.xml
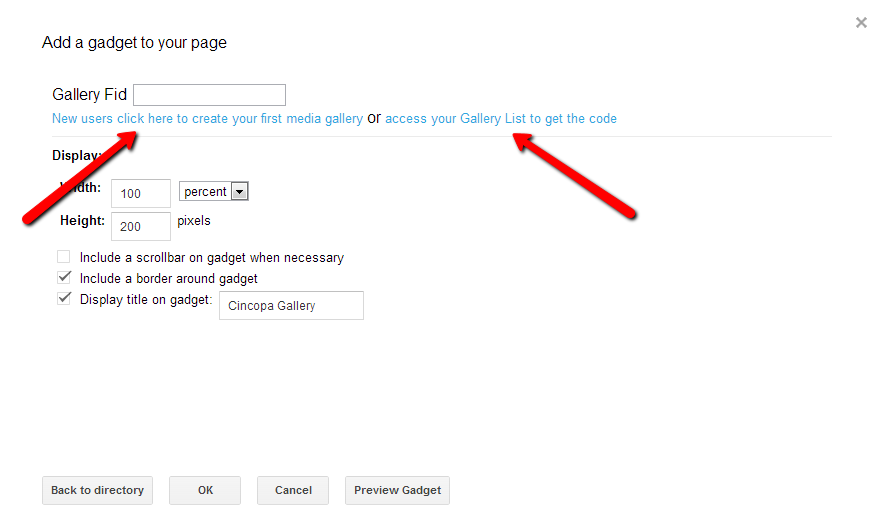
5. Click to create new gallery or to get the existing gallery code
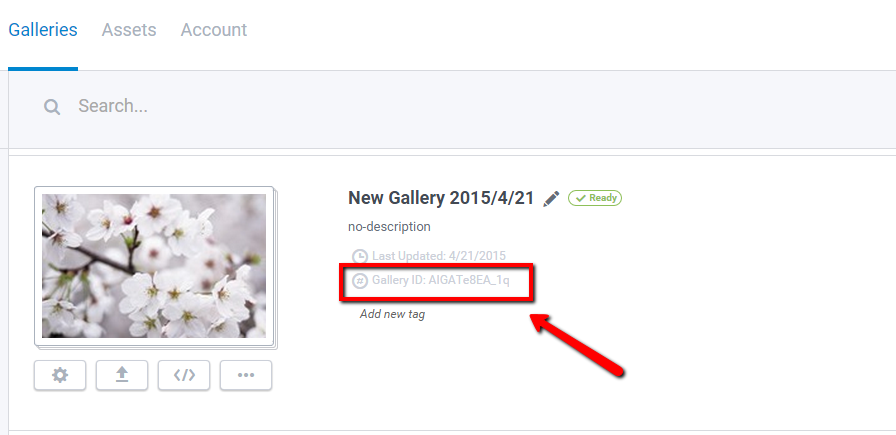
6. Copy the Gallery ID of the gallery that you want to display on Gooogle sites
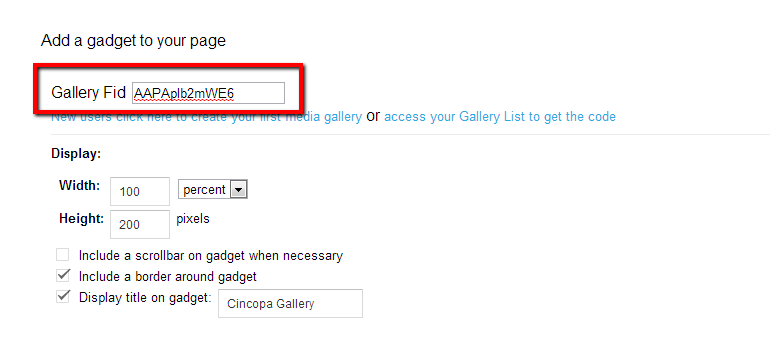
7. Paste the code to Gallery Fid field in Google sites gadget tool
8. Adjust Gadget settings and click “OK”
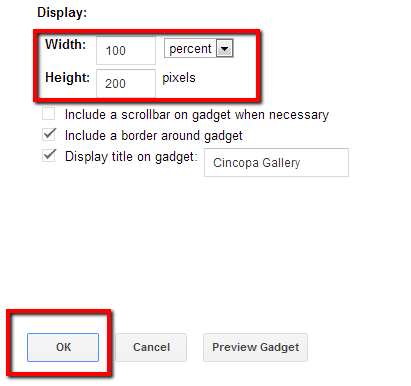
9. Click “Save” on you Google sites page to view the gallery
12. How to embed Cincopa Gallery in Weebly website?
You can easily embed your Cincopa Gallery in Weebly website.
Please follow the steps below:
1. Create your Cincopa gallery
2. On step 4 “Embed Your Gallery” page choose “weebly” and copy the code of your gallery.

3. Go to your Weebly admin panel
4. Click “Build” and choose “Embed code</>” element to drag and drop where is indicated.
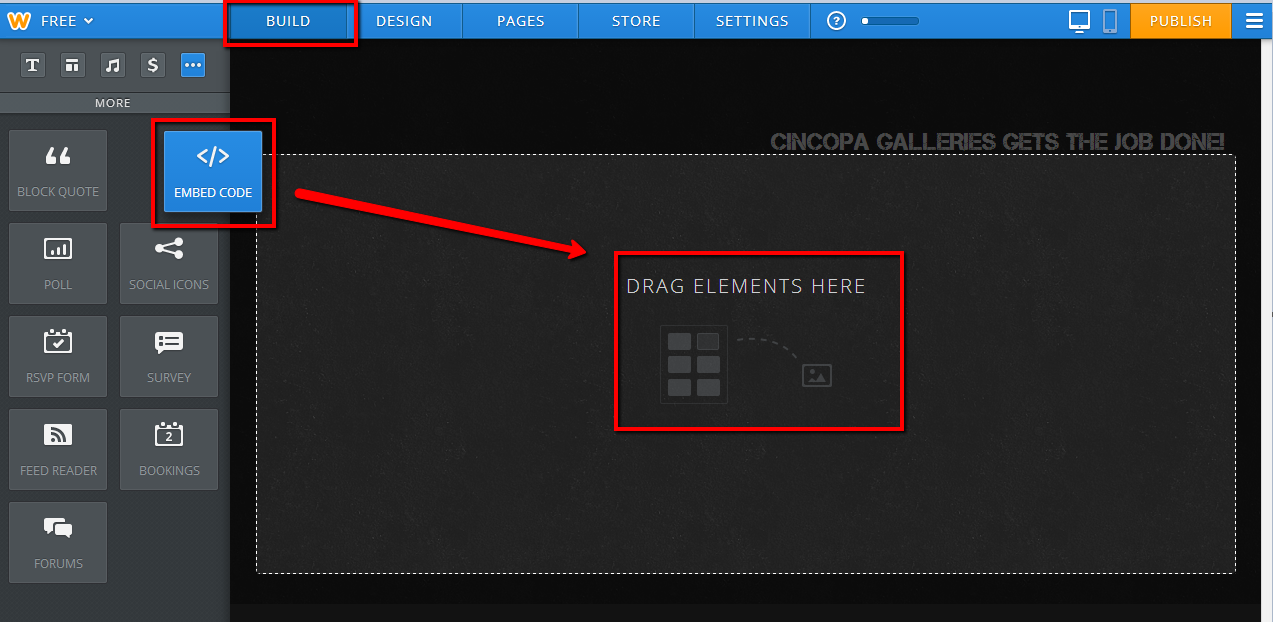
5. Click inside the Embed Code element or click on “Edit Custom HTML” to paste the Cincopa gallery code.

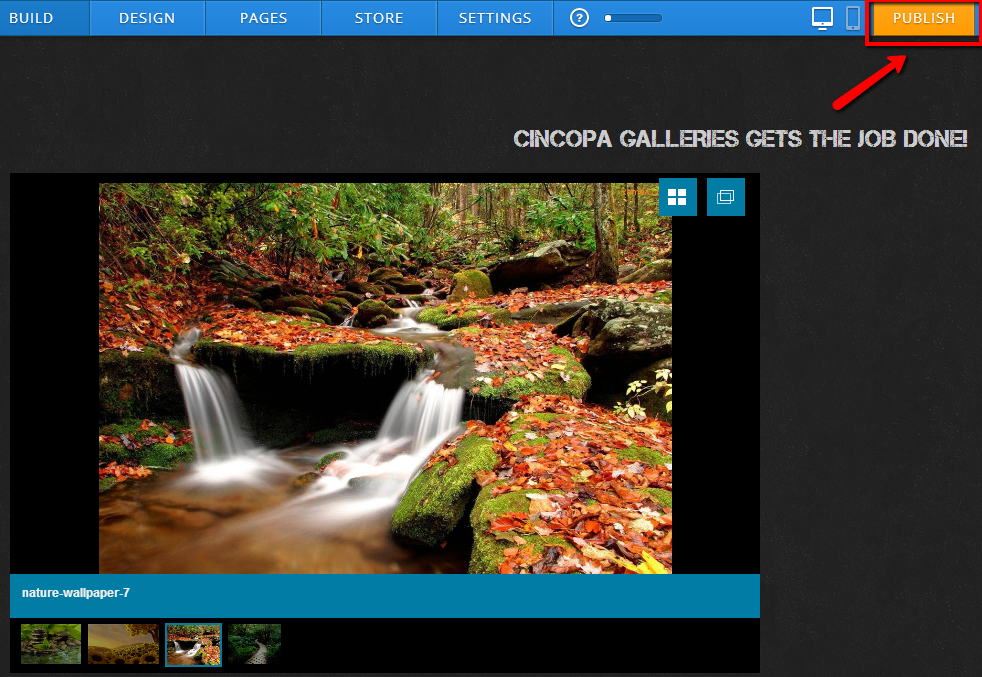
6. Code is added to your site. Publish your weebly website page.
13. How to embed Cincopa Gallery in Microsoft Office 365 website?
Cincopa gallery plugin can be used in Microsoft Office 365 website.
To add your photo gallery, slideshow, video or audio player please follow the steps below:
1. Create your Cincopa gallery
2. On step 4 “Embed Gallery” page choose Other – “Office 365” and copy the code of your gallery.
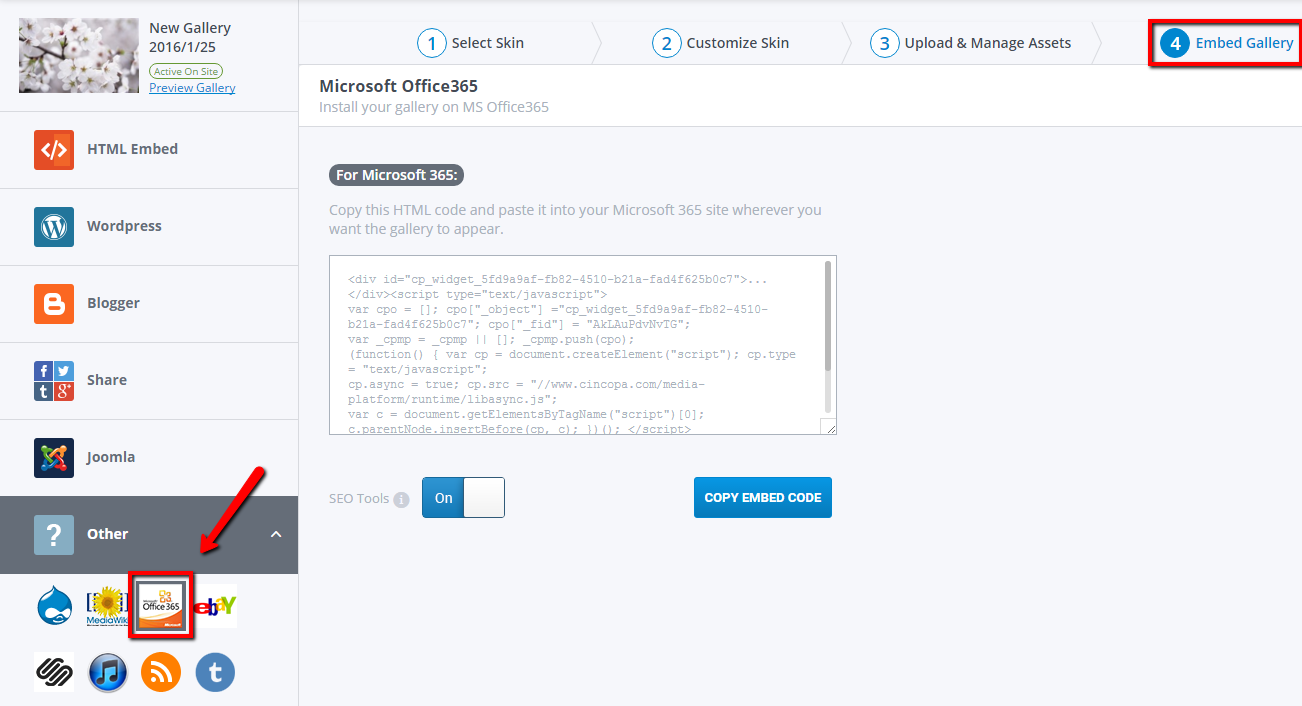
3. Paste the embed code to your Microsoft Office 365 website following the steps below:
Login to you Microsoft365 website and go to the page you want to edit.
Click Page -> Edit and then from the Format Text tab, click Edit Source

Locate the position where you want to insert the gallery code. The page you see will look something like this:
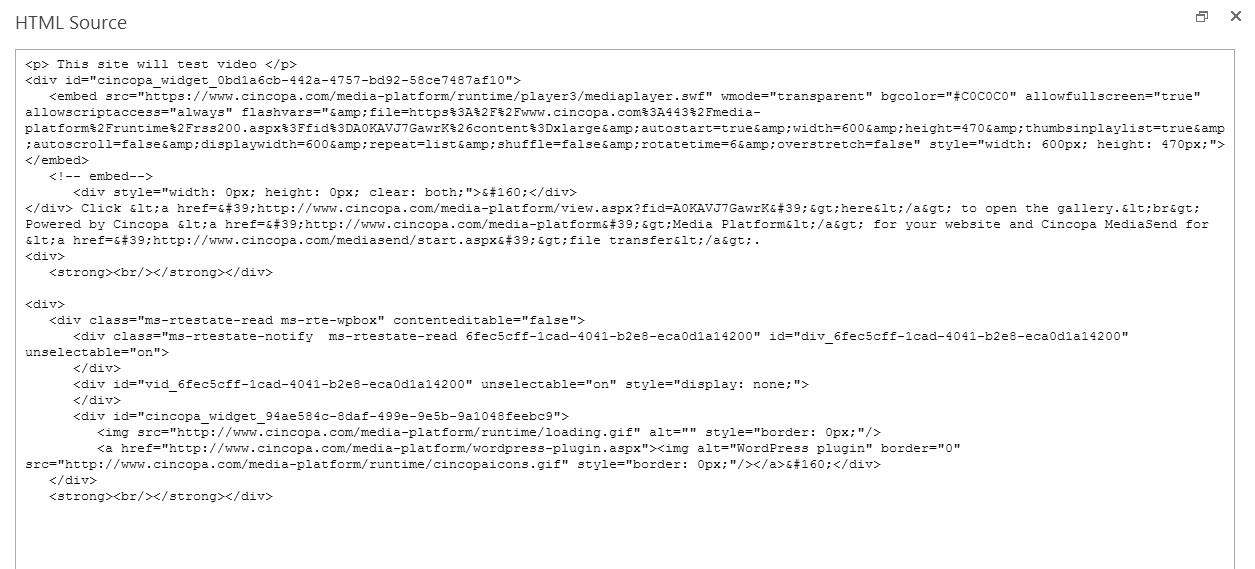 Paste the code you copied from Cincopa.
Click OK.
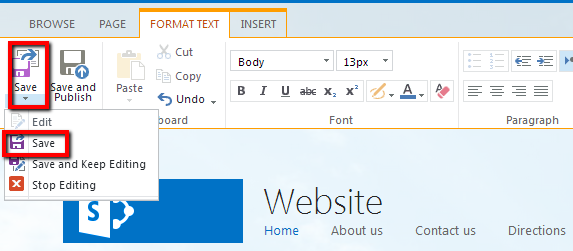
Click Page -> Save ->Save then open the page in a new browser windows to confirm that the gallery looks good.
14. Drupal 7
Cincopa for Drupal 7
When you edit or create a node, just make sure you select “Full HTML” in Text Format.
Please see screenshots:
http://postimage.org/image/tc0rcjk57/
http://postimage.org/image/puxvhcmdn/
Try to go to your specific node page where you can see your gallery and see what happens.
Instead of using the Drupal CODE, try the HTML code. Please see http://help.cincopa.com/entries/21706547-other-cms-for-cincopa
15. How to post a Cincopa gallery in a TypePad blog post?
This guide describes how to display a Cincopa gallery on TypePad.
This guide assumes you have already created a gallery within your Cincopa account and that you have a TypePad account. If you have not created a gallery, please follow the Getting Started Guide or the How to Create a Gallery Video before continuing.
To embed your Cincopa Gallery in TypePad website please follow the steps below:
1. Create your Cincopa gallery
2. On step 4 “Embed Your Gallery” page choose “TypePad” and copy the code of your gallery.
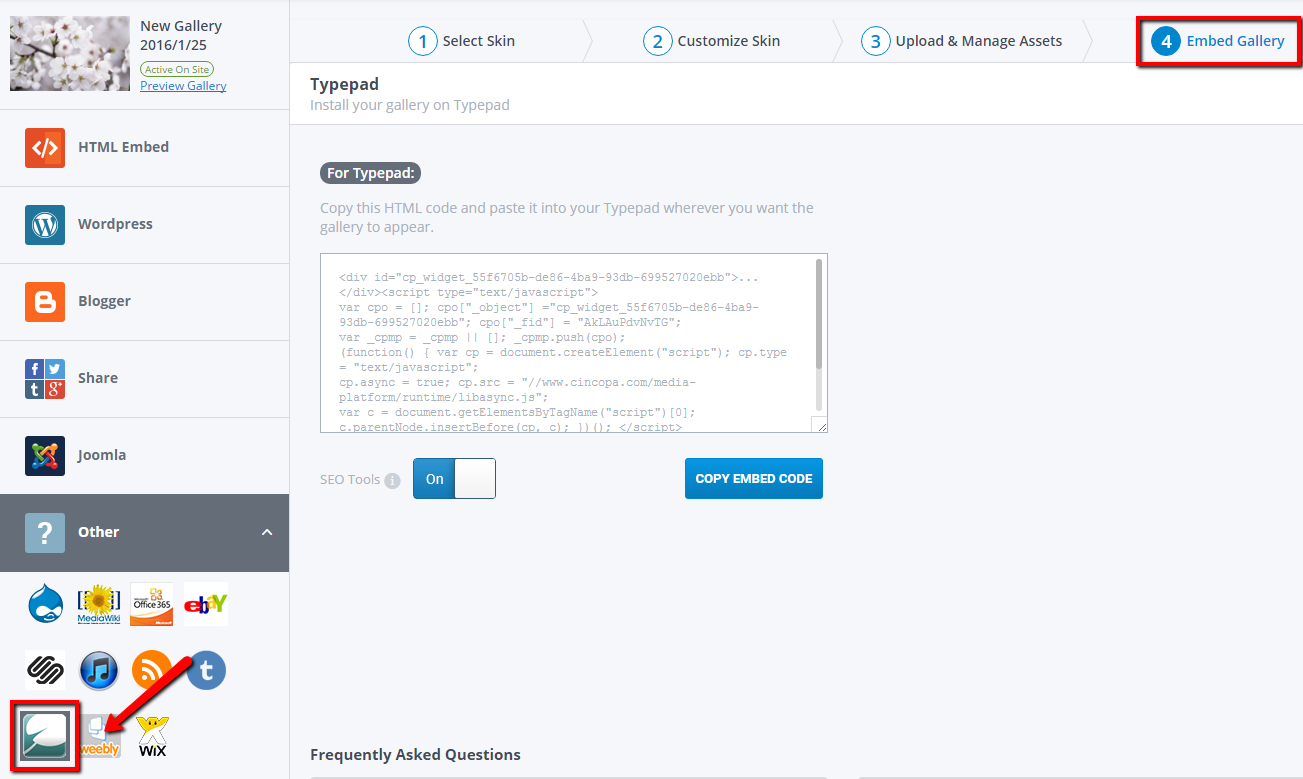
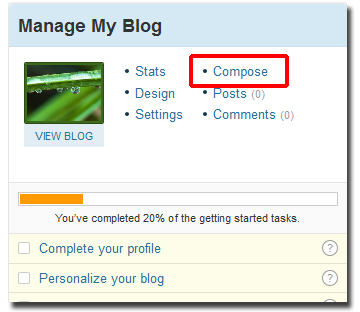
3. Log in to your TypePad Dashboard. On the right side of the Dashboard in the Manage My Blog box, click Compose.
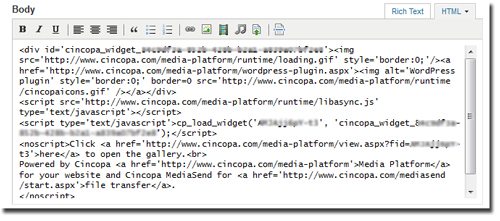
4. The code you copied must be entered in the HTML editor, not the Rich Text editor. To access the HTML editor, click HTML above the editor box.

5. Paste the code into the HTML editor box.
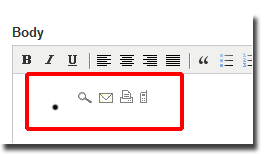
6. Make any other edits you need. If you switch back to the Rich Text editor from the HTML editor, you will see the Cincopa gallery placeholder in the editor shown below. Do not remove it.

7. Click Save to publish your post with the Cincopa gallery.
16. BuddyPress – How can I limit users to photo-only uploads and not videos?
17. BuddyPress – How do I embed a gallery in activities and profiles?
Follow this link to create your gallery. In the last page of the wizard, get the WordPress code for the gallery and paste it in the activity or profile.
Make sure that the Cincopa WordPress plugin is installed.
18. What password should I use to get my API keys?
When you install the Easy Album Plugin it does not ask for any password. If you are asked for a password then you accidentally clicked on the link to get the API key. Please follow these steps:
- Uninstall the Easy Albums Plugin
- Reinstall it the Easy Albums Plugin
- When you reinstall the Easy Albums Plugin, follow the instructions in the installation steps that will take you to the page where you will find the link to get the secret key
19. I’ve created a gallery. How do I get the gallery into my blog?
In the last page of the gallery creation wizard you will get a tag and an html code. Simply copy and paste one of them into your blog or web site.
20. Can I use the W3TC plugin?
Cincopa uses a 1st tier CDN network to deliver your media, there is no need for you to use the W3TC (Total cache) plugin.
Cincopa CDN support is automatic and will ensure smooth streaming of your videos and fast loading of photos and music in every country that your viewer might be.
21. Download CMS Plugins
 Buddypress
- Our standard WordPress plugin will work on Buddypress for the blog/site owner WordPress.
- This plugin will allow visitor to add photos, videos and music to your Buddypress site, works like Facebook photos Easy Album plugin
- Read more http://extensions.joomla.org/extensions/external-contents/multimedia-channels/photo-channels/11348
- This is a simple extension which allows you to put a Cincopa Multimedia Gallery in your MediaWiki articles, so you can enjoy rich video streaming, image galleries, music and podcasts in your wiki site.
 Windows Live Writer
- Every CMS that Cincopa support can be used with Windows Live Writer, first step is to install the plug for your CMS for example install the WordPress Plugin.
- Next step is to create your gallery and when you are done copy the tag (will look like this
) and paste it at your Windows Live Writer post, click publish and you are done.

Following is a list of CMSs that we support but we don’t have a specific plug-in or extension. Use the HTML version of your gallery (get code page) and paste it in the right place in the CMS.
- Blogger.com
- Weebly
- Webs
- Typepad
- phpbb
- moodle
- TYPO3
- vBulletin
If you’ve tested or want us to test Cincopa with a CMS that is on this list please let us know :
- simplemachines.org
- movabletype.org
- noahsclassifieds.org
- moodle.org
- bbpress.org
22. What about other sites?
Most CMS and web authoring tools support pasting HTML code. Create your gallery in Cincopa and then at the last wizard page copy the HTML code and paste it into your site’s HTML.
23. Do you support Weebly.com?
Yes. Learn more about Weebly and Cincopa
24. Can I edit my widget when it is already on my site?
Yes. Go to the edit page, select your widget,click edit and Add/remove items. The changes will be immediately available on your site. No need to get a new tag or to edit the post/page.
25. Can I customize my widget?
The plug-in will show a list of available parameters and instructions to customize your widget at the end of the creation process.
26. Can I use the widget in other non-WordPress sites?
Yes. You can embed the widget in any site that support html code like any CMS site, site builders, drupal, www.blogger.com, www.blog.com, www.typepad.com, your site etc. Access www.cincopa.com, and continue from there. At the end of the process you’ll get an html code that you can copy and paste into your site.
27. Can I create a widget without installing the plugin ?
Yes. Access www.cincopa.com, and continue from there. At the end of the process you’ll get an html code that you can copy and paste into your post. The plug-in will make the whole process of creating and managing your widgets much more intuitive and simple thus it is recommended.


