1. How to group media files by tags in Responsive Imagelist and Accordion slider galleries?
NOTE: If a file or several files are untagged, these will be moved to no-tag group automatically.
In order to use this feature please follow the steps below:
- Create your Cincopa gallery by selecting Responsive Imagelist template or Accordion Slider template.
- On step 2 click on the “Advanced” tab.
- In order to display tagged group name, select “Tag Name (group images)” under “Add text”.
- Set “Group images” setting set to “ON” and add the tags under “Group images tags”.
NOTE: In “Group images tags”, enter tag or tags to group those items, use no-tag for items without any tag. - Upload media files and add tags for your media files. All untagged files will be moved to no-tag group automatically.
2. Can the speed of the slideshow with background audio be adjusted with the free version of Cincopa?
No, only Pro Account users are able to adjust the speed of their slideshows by “Slideshow speed” option under Advanced settings.
To learn more about our Pro Account or to sign up, visit our Upgrade Page.
3. Why are some of my photos rotated?
There are three steps to correct the orientation of a photo in your gallery:
- Rotate the photo to the correct orientation
- Save the photo with the correct orientation
- Upload the photo with the corrected orientation to your gallery replacing the photo with the incorrect orientation
You can follow the example steps below to learn how to change the orientation of a photo.
How to Change Photo Orientation using Windows
Problem
Your uploaded photo appears like this  instead of this
 ![]()
Resolution
- Locate the photo on your computer.
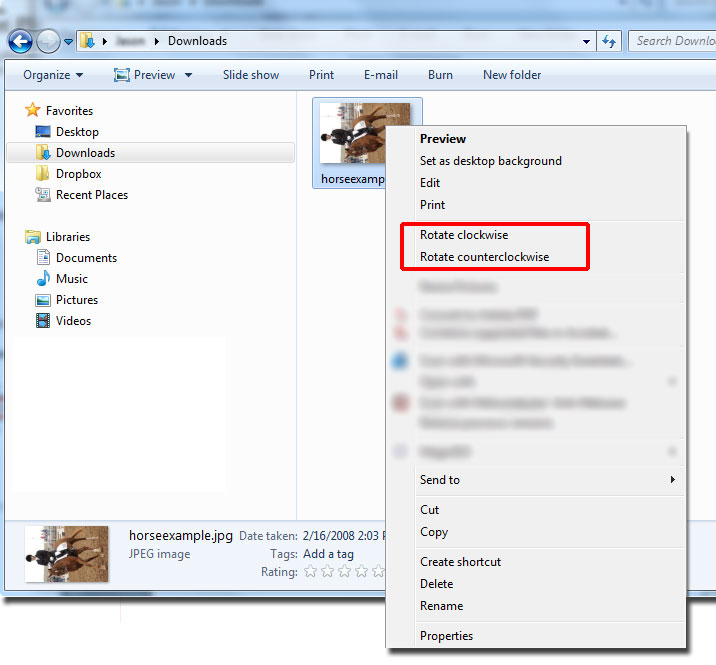
- Right click on the photo and choose Rotate clockwise or Rotate counterclockwise (depending on what direction you need to rotate) from the context menu. (Don’t have the rotate options? Read on here).

- After you rotate the photo to the proper orientation, upload the photo to your gallery replacing the photo in your gallery with the incorrect orientation.
I Don’t Have the Rotate Option!
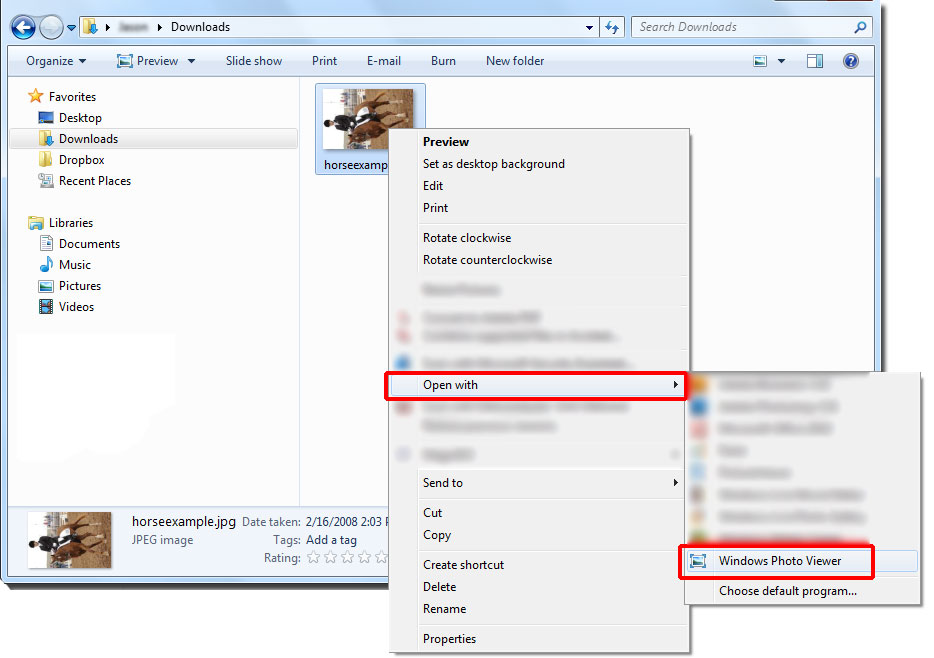
- If the Rotate option is not available on your context menu, then choose Windows Photo Viewer from the Open with menu. Your photo will open in the Windows Photo Viewer.

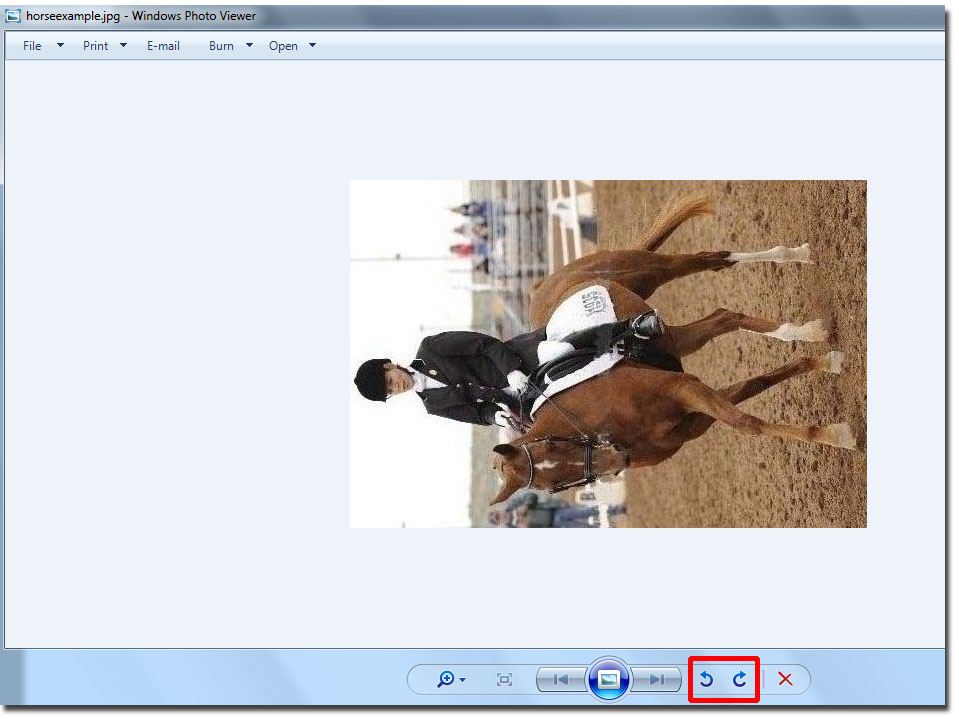
- Click the rotate arrows to correctly orient your photo.

- After you rotate the photo to the proper orientation, upload the photo to your gallery replacing the photo in your gallery with the incorrect orientation.
4. What features does the Cooliris template offer?
You can find a list of the features here.
5. How do I add a slideshow?
To learn how to add a slideshow to your page, follow the steps in the Getting Started Guide.
6. Can I create a link in the caption/description box for an image?
Yes, with some of our templates you can. To add a link in the caption/description box for an image, simply add the HTML code for the link in the caption or description box.
Example
HTML CODE:
<a href=”http://wpcincopaplugin.ronica.net/examples/smooth-gallery” target=”_blank”>http://wpcincopaplugin.ronica.net/examples/smooth-gallery</a>

This method cannot be done with Cooliris templates.
7. How do I edit the file names so that they do not show up on my website?
The titles of the files or “file name” that are being displayed are part of the files themselves. They are what we call metadata (data that is stored when the file is saved in your PC/Mac). You can rename the file name but a user can’t leave the file name blank.
To keep the file name from appearing on the website, add a caption in the caption field while editing your gallery. If the caption field is left blank, the file name will show up on your website.
8. How can I change the size of the thumbnails for the Tilt Viewer template?
Currently, we don’t have the option to manually change the size of the thumbnails for the “Tilt Viewer” template.
However, you can change the size of the “template” itself. Using this template, if you hover the mouse over your gallery, the size of the thumbnails automatically changes while scrolling the mouse.
9. Can I create sub-galleries?
You cannot create another gallery or sub-galleries inside an existing gallery. However, you can create any number of galleries and upload files in those galleries as per the storage capacity of their account.
10. What happens if my page is formatted incorrectly when adding a gallery?
Cincopa Gallery might sometimes clash with other components in your page. To resolve this problem you can choose another template or opt-in the iframe option.
11. Can I make the Smooth Gallery info pane text and make the info pane itself smaller?
WordPress users can customize the info pane as per their design requirement and can set the fonts, height, background, etc. for the info pane by editing the file style.css of the theme and adding the necessary classes for customization.
For example, the following classes are redefined and override the default CSS classes of Cincopa:
.slideInfoZone{
background:#FF1122 !important;
height:50px !important;
}
.slideInfoZone h2{
font-size:10px !important;
font-weight:normal !important;
color:#FFF !important;
}
Notes:
- The above changes requires the intermediate CSS knowledge
- Using “!important” will only take this CSS class even though other classes are defined.
- Make sure that the iFrame option is opt-out (unchecked) or else the page’s CSS will not have any effect.
12. How can I edit an existing caption in an existing gallery?
Click on “Galleries” (or use this link https://www.cincopa.com/wpplugin/wizard_edit.aspx)
Click edit on the gallery you want to edit and continue from there to the page where you can edit captions, descriptions and the other.
13. Is there way to control the font used on the caption for the smooth gallery?
Yes with some of our templates, the font is derived from the page’s CSS unless you opt-in the iframe option which makes the default font serif. This cannot be done with the Cooliris template.
14. Is it possible to add images to the smooth gallery on my site and allow visitors to click on the images and be redirected to articles in my site?
Yes. You have the iframe option opt-in, therefor the entire smooth gallery is inside an iframe. If you opt-out of the iframe the links will work for the entire page.
15. How can I remove the Cooliris watermark from my gallery?
For the Cooliris Templates, we don’t have an option available to remove their watermark, only ours (Cincopa Watermark). Their templates are unique, and they don’t allow their template users to remove their watermark.
16. What features does “Smooth Gallery” offer?
You can find a list of the features here.
17. How do I rotate images in my gallery?
Free account user’s can select any of the below templates so that the images will automatically rotate in their galleries:
1. Smooth Gallery – Large (600×450)
2. Plain rotation with LightBox – Small (200×180)
3. Shuffle rotation with LightBox – Small (200×180)
4. Cover rotation with LightBox – Small (200×180)
5. Plain rotation only thumbs – Small (200×180)
6. Plain rotation – Large (600×450)
7. Slideshow with background music (400×300)
Pro Account user’s can select the above templates and below are few other templates where they can set the Auto Start feature and Rotate Time:
1. Slideshow – Small (350×282)
2. Slideshow – Medium (450×357)
3. Slideshow – Large (600×470)
4. Slideshow with menu – Medium (450×200)
5. Slideshow with menu – Large (600×320)
18. What is a style/template?
19. How can I remove the title of the photos from the Cooliris gallery?
20. How can I insert a hyperlink in the caption and description boxes in my Smooth Gallery?
With Smooth gallery you can add links in caption and description box.
It can work in two modes :
1. Simple slideshow – like http://wpcincopaplugin.ronica.net/examples/smooth-gallery
2. Rotating news tray – like http://wpcincopaplugin.ronica.net/examples/smooth-gallery-sitemap
The trick to do that is to add the url in the Set Caption and Description page. Add “[…]/?p=34” (without the quote sign) after the text of the caption. for example if the caption is New Year is Now, and the post id is 34 then the caption text should look like this “New Year is now […]/?p=34”.
If you don’t know the id of each post this will work too “New Year is now […]/2009/4/2/New Year is now”
Linking to an outside site like this “New Year is now […]http://www.google.com”
21. How can I remove the black outline from the Smooth Gallery?
You can customize almost every aspect of smooth gallery using CSS. For example to remove the black outline add this to your page’s CSS
.jdGalleryDiv { border:0px; }
Make sure that the iframe option in the “customize your template” page is opt-out.
22. How can I exclude the files (photos, videos or audios) from the Smooth Gallery already embedded on the website?
We have the feature available to exclude an individual file or files from the gallery already embedded on the website. Once removed from the Cincopa gallery the files will not show up in the website. However, a user can add the removed file, back to the gallery from the CloudDrive. A user does not have to re-embed the gallery to his\her website. Here are the steps to remove the files from the existing gallery:
1. Sign in to Cincopa
2. Click on “Galleries” from the top-left menu.
3. Hover your mouse over your gallery, and the following options will appear:
-test
-rename
-edit
-duplicate folder
-resync
-get code
-delete
4. Click on “Edit”.
5. Select your template and click “Save and Continue” on the top right corner.
6. You have reach the upload page. On this page you can click on “Remove” to exclude the file(photo, video or audio) which you don’t want to appear on your post.
7. After you are done, click on “Finish and Continue”.
8. Then you will reach the page where you can edit or remove the captions of every file.
9. Then click on “Save and Continue” and refresh your web site
23. How do I sort my Smooth Gallery alphabetically?
Currently, we don’t have this feature available.
